How to Install Your Zira AI Camera: A Step-by-Step Guide
Installing your Zira AI Camera is a straightforward process. Follow these steps using the numbered components from your kit to set up your camera and gateway system seamlessly.
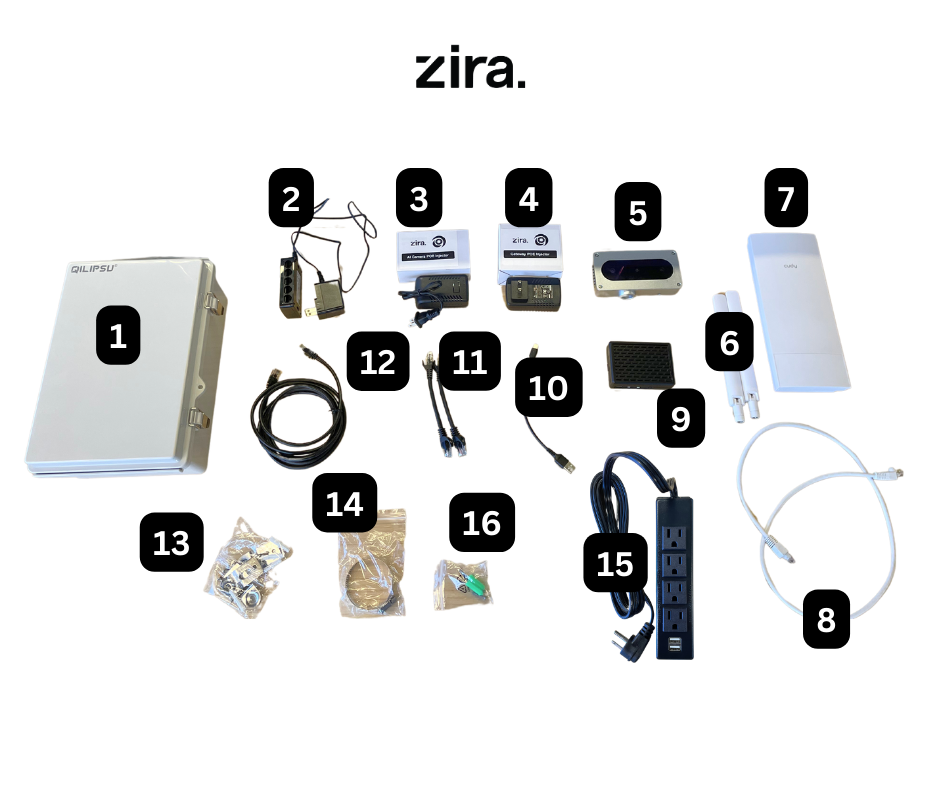
Your package should include:
1) Outdoor Electrical Box
2) LAN switch
3) AI Camera PoE injector
4) Gateway’s PoE injector
5) OAK-D AI Camera
6) Gateway’s antennas
7) Pre-configured gateway (& sim card)
8) White Ethernet Cable (For Gateway)
9) Pre-configured Raspberry Pi
10) USB-to-USB C cable
11) 2 short CAT5e LAN cables
12) Black Ethernet Cable (For Camera)
13) Electrical Box Bolts
14) Metal Band
15) Power splitter
16) Additional Bolts
Note: The numbers of each object correspond to the labels in the provided picture to help you easily identify each component.
Installation Instructions
Notes:
- Three holes need to be drilled for the following cables:
- PoE cable connecting to the gateway
- PoE cable connecting to the camera
- Power cord
Gateway Setup:

2) LAN switch 4) Gateway’s PoE injector 6) Gateway’s antennas 7) Pre-configured gateway (& sim card) 8) White Ethernet Cable (For Gateway) 14) Metal Band 16) Additional Bolts
Note: The numbers of each object correspond to the labels in the provided picture to help you easily identify each component.
- Attach the Antennas: Screw the gateway’s antennas (6) to the top of the gateway (7).
- Connect to Injector: Connect the gateway (7) to the gateway injector (4) via the PoE port using a CAT5e (or better) cable (not provided).
- Link to LAN Switch: Using the white Ethernet cable (8), connect the gateway PoE injector via the LAN port to the LAN switch (2).
- Mounting: The gateway’s mounting gear (14 & 16) are optional but recommended for stability.
Camera Setup:

2) LAN switch 3) AI Camera PoE injector 5) OAK-D AI Camera 11) 2 short CAT5e LAN cables 12) Black Ethernet Cable (For Camera)
Note: The numbers of each object correspond to the labels in the provided picture to help you easily identify each component.
- Connect to Injector: Using the black Ethernet cable (12), connect the camera (5) to the camera PoE injector (3) via the PoE port.
- Link to LAN Switch: Use a short LAN cable (11) to connect the camera PoE injector (3) to the LAN switch (2) via the LAN port.
Raspberry Pi Setup:

2) LAN switch 9) Pre-configured Raspberry Pi 10) USB-to-USB C cable 11) 2 short CAT5e 15) Power splitter
Note: The numbers of each object correspond to the labels in the provided picture to help you easily identify each component.
- Connect to LAN Switch: Use another short LAN cable (11) to connect the Raspberry Pi (9) to the LAN switch (2).
- Power Connection: Using the USB-to-USB C cable (10), connect the USB-C side to the Raspberry Pi (9) and the other side to the power splitter (15).
Electrical Connections:

2) LAN switch 3) AI Camera PoE injector 4) Gateway’s PoE injector 15) Power splitter
Note: The numbers of each object correspond to the labels in the provided picture to help you easily identify each component.
- Power Up: Connect the power splitter (15) to an outlet.
- Power the LAN Switch: Connect the LAN switch (2) power cable to the power splitter (15).
- Power the Camera Injector: Connect the camera PoE injector (3) power cable to the power splitter (15).
- Power the Gateway Injector: Connect the gateway PoE injector (4) power cable to the power splitter (15).
By following these steps, you can ensure your Zira AI Cameras are installed correctly and ready to provide accurate real-time data and insights. If you encounter any issues during the installation process, please refer to our support page or contact customer service for further assistance.

